Packages allow you to bundle multiple events and/or catalog items together. The customer can purchase all these items together at one price point. Packages can be used to create season subscriptions for concert or athletic seasons, so that patrons can renew their seats from year to year. They can also be used to sell event series with unique selection rules, such as a "Pick 5" package were a patron can pick 5 events out of a greater list of events/showings.
This article will first review how to set up package redemption tickets and then how to set up a package and its component groups.
Note: Always be sure to test a package to make sure it is set up properly before putting it on-sale.
1. Log In to Administration.
2. Choose the Sales Organization folder where you wish to build the Package and its Events and/or Catalog Items.
3. If your Sales Organization folder does not have the Package option listed, you will need to add the option via Tree Management.
- Right-click your Sales Organization folder. In the new window, select the Tree Management tab.
- Check the box next to Packages. Select Apply to save your changes and OK to close the window.
4. Individual Showings, Events, or Catalog Items for the package must be built first. Prices and ticket types for this package must be built onto these items before proceeding.
- The Event Prices and Product Prices for each item can be built with a unique Ticket Type for the package, such as "Package" or "Package Redemption Ticket." This will make the tickets easier to find and add to the package component groups in Step 21.
- It may be helpful to set the Functional Area of the package ticket or item prices to be Level 1 - Restricted Price(s). This will help prevent agents at the box office or patrons online from accidentally selecting the Package ticket outside of a Package transaction.
- If you want each Package ticket or item to be printable or have a PDF, make sure to select a format in the Package Ticket Format dropdown list. (The format does not necessarily need to be a unique format for the package tickets. Many clients use their normal ticket format for package event tickets.)
- To set the price of each Package item, there are two approaches you can take.
- Divide the total price of the package by the number of tickets in the package. For example, if the total price of the package needs to be $85 for ten tickets, then the price of each package ticket should be $8.50. Splitting the price of the package across its event tickets provides straightforward reporting for package tickets on individual Event reports. You may want to use this approach if reporting the revenue from individual package tickets to distributors or ComScore is an important concern for your organization.
- The Price can alternatively be set as $0 if you build the package price into a Catalog Item price and add it as a Catalog Component later in the process. For example, if the total price of the package needs to be $85 for ten tickets, then the price of each Package ticket would be $0 and the price of the Catalog item would be $85. This can be a simpler approach than splitting the total cost across each event ticket. If you are not concerned with reporting the revenue of package tickets to distributors, then feel free to take this approach.
Once you have all your individual showings, events, or items built, you are ready to start creating your Package and its Component Groups.
5. Click the Package icon. Then, right-click in the Package area and select New.
6. Select a Group for this Package from the dropdown list or use the ellipsis button to add a new group name such as "Series", "2022-23 Season", etc. Then, enter the Name and External Name of the package. (The Name will only appear to you internally, such as on reports and the AMS screen. The External Name is what will appear to customers online and on their order confirmations).
- The Enforce Selection of Optional Component Groups checkbox allows you to require a customer to select a given number of Component Groups when they purchase the package instead of selecting every Component Group. This is especially useful in "Pick 5" or "Half Season" packages that are built with a Component Group per event or show, because checking this box can prevent customers from selecting every Component Group available. If you do check the Enforce Selection of Optional Component Groups box, make sure to set the Minimum and Maximum to control the number of events a customer may choose.
- Allow Renewals should be checked if this package is meant to be renewed year after year.
- Require Customer should always be checked when selling a package in order to store important customer data for the multiple events.
- If you want the name of the purchaser to automatically be listed as the name on the package, check the box next to Assign Order Customer.
7. The Package Types tab is where you will build the different price types for this package (Adult, Senior, Member, etc.) and create each price type's Marketing Price.
In the Package Types area, right-click and select New. This will open the Package Type window. This has many of the same features as other price creation windows in Agile, with a few unique features:
- Select the Sales Line Type for this package price type. If you are unable to select the Sales Line Type when trying to create a Package Type, please contact your Agile Support Agent.
- Marketing Price: This is where you can list the overall price for the package as you'd like it to appear to the customer. Note: The Marketing Price is for display purposes only. The actual cost of the Package will be automatically calculated by adding the cost of individual Event and/or Catalog Components together.
- Ticket Format: a unique format can be selected for the package as a whole. Some organizations use this to create passes or cards that can be printed or emailed to patrons. When the Print On Card option is selected for every Event Component below, this pass/card format will be given a barcode that lets the patron scan into every event in their package. This may be more convenient for the patron than keeping track of several individual ticket formats for each event.
8. Click the Sales Channels tab to set the package's on-sale dates and times.
9. Click the Delivery tab to choose delivery options for the package.
10. Click the Access Buyer Types tab. This tab allows you to select the different Buyer Types on which this package can be sold. For example, if you want this package to be available for in-person renewals and new purchases, then you would add both a standard AMS Buyer Type (i.e. AMS - Box Office) and a renewal Buyer Type (i.e. AMS - Renewals). Note: if you do not select any Buyer Types in this at all, then this package cannot be sold in any way. If you ever run into issues while testing this package, reviewing the Access Buyer Types tab is a good first step for troubleshooting.

12. The Short Descriptive tab is where you will be able to put a short synopsis or description of what is available through this package.
13. The Description tab is where you can place long, descriptive verbiage about the package. This information will be nested under a (More Info) link on the Package page online.
14. The Extra HTML tab allows you to add further descriptive information for this package.
15. The Confirmation tab is where you can add any verbiage that you would like the customer to be sent via an order confirmation after the order is finalized, such as a thank-you or directions about package materials will be mailed.
16. Click the Image tab to upload a visual for the package.
17. Once you have your Package information completed, click Apply to save your changes and OK to close the window. Then, right-click in the Component Group area and select New.
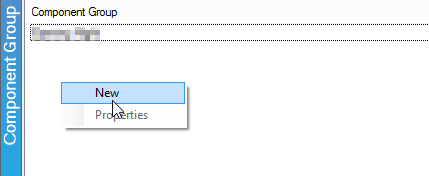
18. Name the Component Group (i.e. "Events", "Show 1", "Pick 6").
19. If necessary, set the Enforce Component Quantities for this Component Group. Checking this box will require a customer to select between a Minimum and Maximum number of Components within this group in order to complete the package. An example of this would be a "Pick Your Own" package where customers can choose between ten offered films but must select between two and five events to complete the package. In this example, the Enforce Component Quantities would need to be set to a Minimum of "2" and a Maximum of "5". Set the Display Sequence for this Component Group.

20. Click Apply to save information in the General tab.
21. Click the Event Component tab to add individual event tickets to this package:
- Select Sales folder containing the events you need.
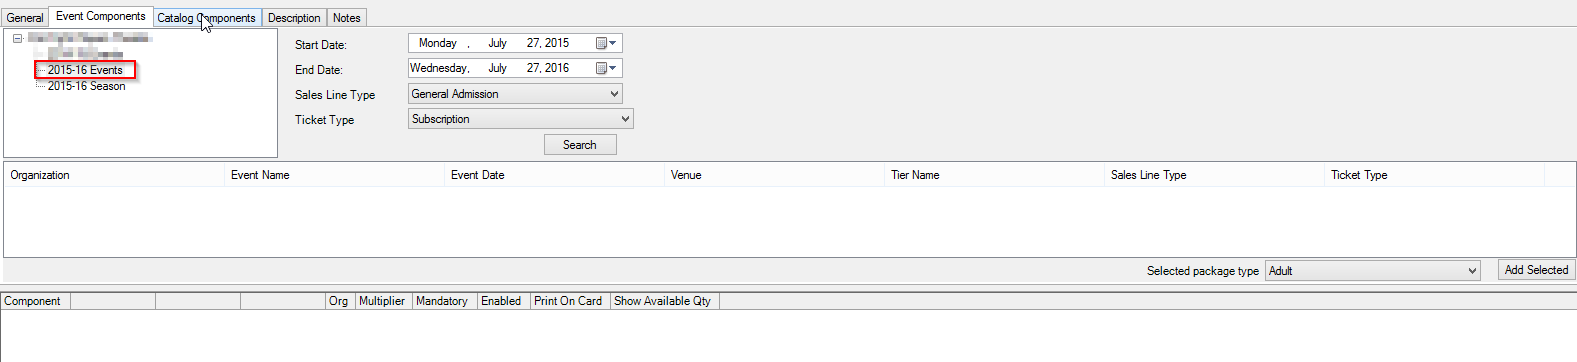
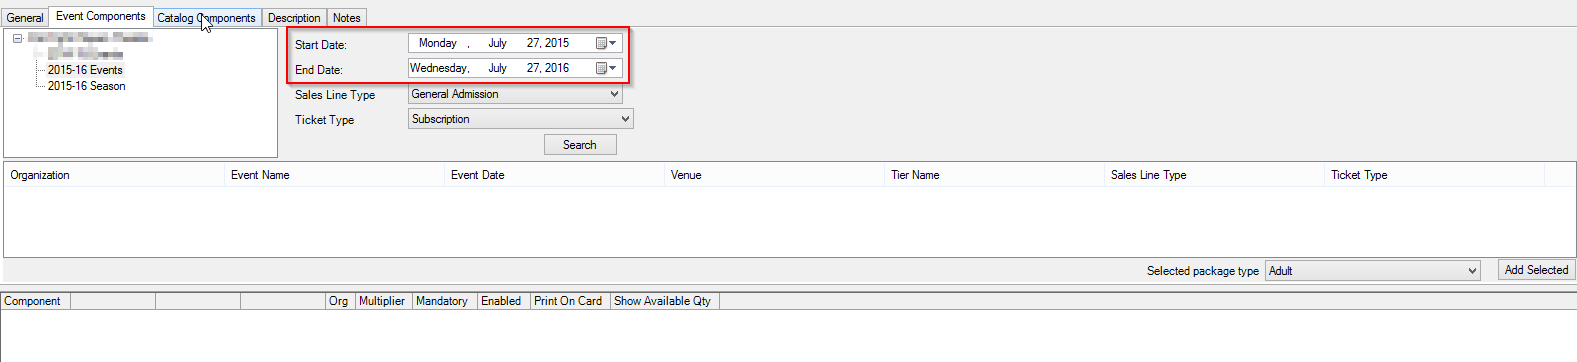
- Use Start Date and End Date parameters to search for events within a given time period. (The initial dates should default to today's date and a year in the future.)
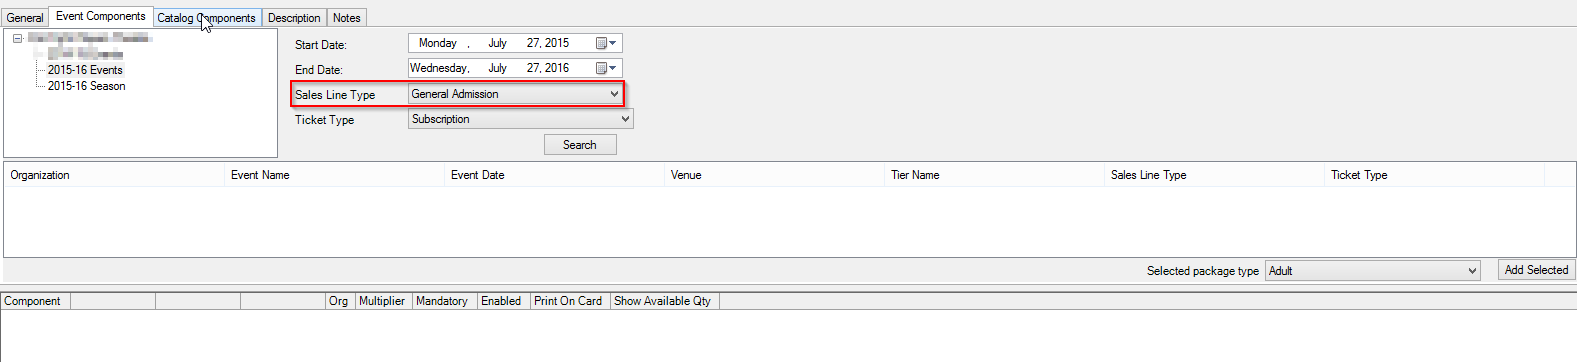
- Select the Sales Line Type of the event you're looking for from the drop-down menu.
- In the Ticket Type drop-down, select the ticket type you set for the event price back in Step 4.
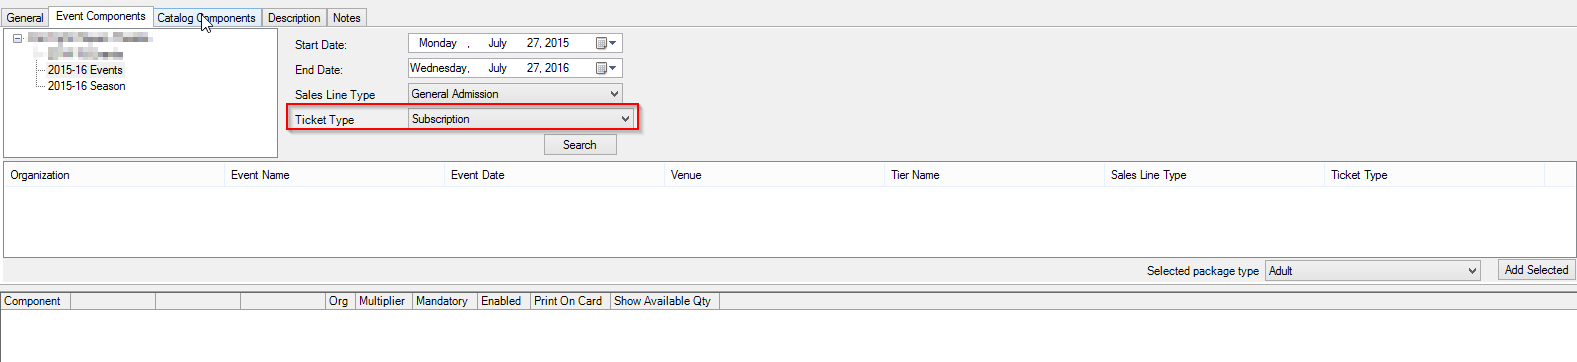
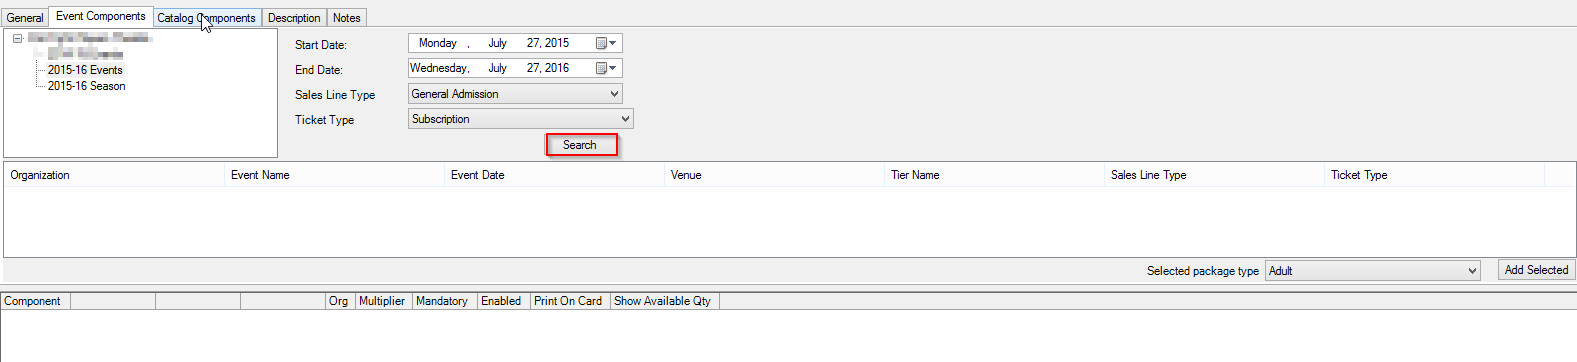
- Click the Search button to populate the list of events with that ticket type into the white box on this tab.
- From the list of available events, select each of the events that should be bundled together in this Component Group.
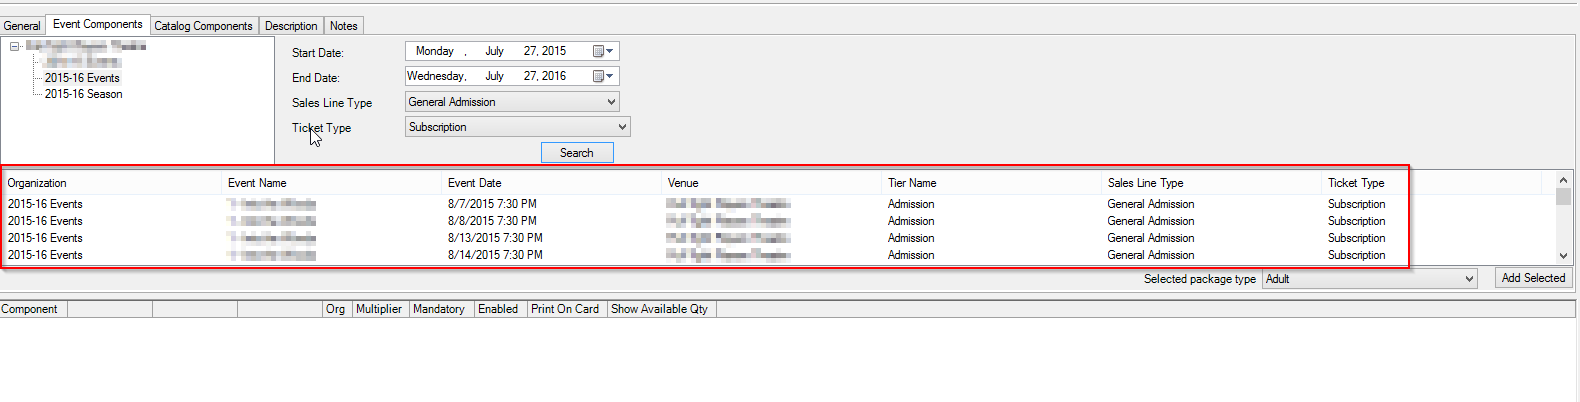
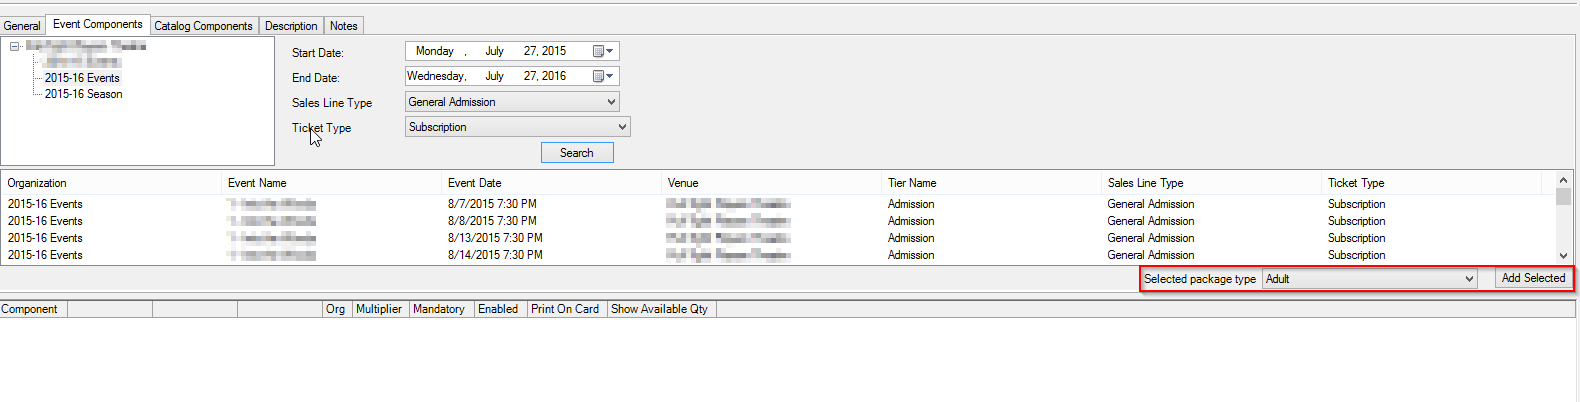
- At the right side of the event list, go to the Selected Package Type dropdown list. Select the package price type to which you would like to add this event (i.e. Adult, Senior, Member). Then, click the Add Selected button.
-
The Package Type and the Event Component Ticket Type will appear in the Component table. This table has many notable features that can adjust how this component functions:
- Multiplier: If you want the patron to receive more than one of this ticket per package, change the multiplier number. For example, if the patron should receive two tickets to this event per package, then change the multiplier to 2.
- Mandatory: Check this box if you want this component to be a required part of the package purchase.
- Enabled: Leave this checked on to keep this component turned on and an active part of the package. (If you later realize that this component is no longer necessary, but sales have already occurred so that you can't delete it, you can disable the component instead.)
- Print on Card: If you want the barcode on the Package Type's Ticket format to be valid for scanning into this event, check this box.
- Show Available Qty: If you want the number of available inventory for this event to be displayed when the patron is reviewing this component online, check this box.
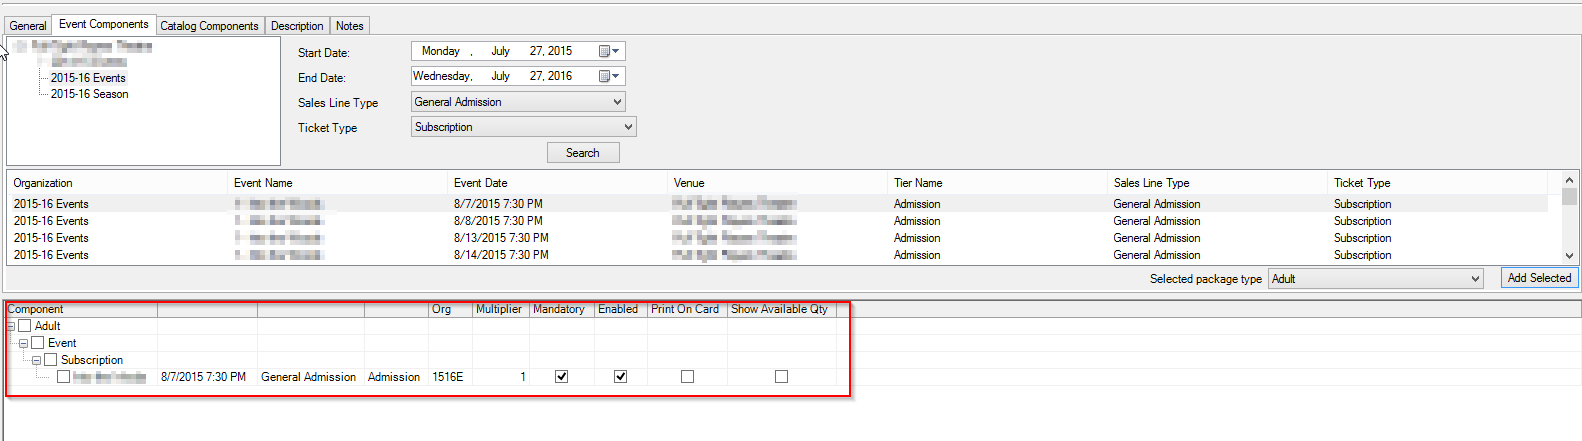
- Click Apply to save your changes.
- If you want to see the pricing for this grouping and each sales channel, choose the Buyer Type from the drop-down next to Show Prices for.
- If you made a mistake and need to delete a component, checkmark the box next to component and Click the Delete Selected Components button.
![]()
*Skip to Step #24 if not using the Catalog Component feature*
22. Catalog Components can also be included in package. Click the Catalog Components tab and select the Sales Line Type and the Catalog Product Price Type to search for the items.
23. At the right side of the item list, choose the package price type to which you would like to add this item (i.e. Adult, Senior, Member) from the Selected Package Type dropdown list and click the Add Selected button.
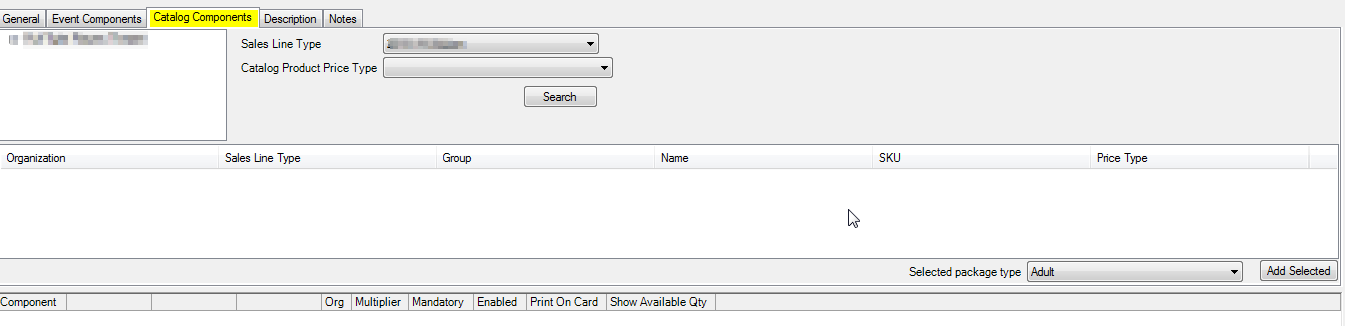
Note: In the Component table, Catalog Components do not have the Print On Card or Show Available Qty properties. They only have the Multiplier, Mandatory, and Enabled properties.
24. Depending on the package you are trying to set up, you may need to create multiple Component groups. Some Packages may have a Component Group for each Show in the Package, plus an additional Group for a Catalog Component. Some Packages may have one Component Group with all items in it. Whether you have on Component Group or many just depends on what kind of package you are trying to make.
25. Once you have added all your Component Groups, you are now ready to create an Entry Point for testing and placing your package on sale on your website. See How to Create a Package Entry Point.
Comments